
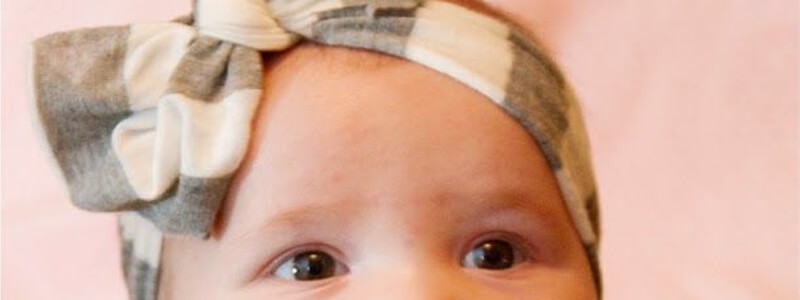
DIY Baby Girl Headband with Bow
I’ve been searching high and low for baby girl headbands. But either I’m too picky or they’re a lot harder to come by than they should be- Or at least for a price that doesn’t break the bank. So I decided to try a No-Sew DIY Baby Headband. And guys, it turned out to be so much easier than I thought it would be.

How to Make Baby Bow Headband
Here’s a little DIY how-to for you. All you need is some stretchy fabric, a pair of scissors, and the ability to tie a bow.
Pick Your Fabric
I’m a touchy-feely kind of girl, so I stopped in our local Joann Fabrics where I could run my fingers along with the fabric as I walked the isles. I was specifically looking for velvet, but any stretchy fabric that doesn’t fray will work for this no-sew DIY baby headband. Just rub your fingers along the raw edges of your fabric to make sure it holds up.
You only need a small piece of fabric. I choose to get 1/4th of a yard because I didn’t know exactly what I was doing. But 1/4th of a yard will yield around 2-4 bows depending on how thick you want them.
Tip: If you are in the store at Joann’s don’t forget to check out their fabric remnant section to score an extra deal!
Easy No-Sew DIY Baby Headband – Little Mrs. Sars – Needed Supplies – cutting velvet fabric with scissors.
Cut Your Fabric
Most fabrics will be more stretchy in one direction than the other. If possible you want to cut your fabric so that it stretches lengthways.
You can measure your baby’s head if you wish. But the stretch will have a lot of forgiveness so it doesn’t need to be exact. Plus you will be able to tie and adjust your bow as much as you need to.
I cut a strip about 5″ x 30″ for my no-sew DIY baby headband. However, my daughter has a pretty small head for her age. I would recommend cutting your length at 36″. But you can adjust the width and length however you wish. Just remember that the wider the fabric, the wider the headband and bow will be. And the longer the fabric, the bigger your bow will be.
Take a look at the image below as an example. The same method was used, but the fabric was cut to different lengths and widths. The middle one is the dimensions listed above and the top one is about 9″ x 35″.
Tip: If you cut yourself some extra length to play with, you can always trim it.
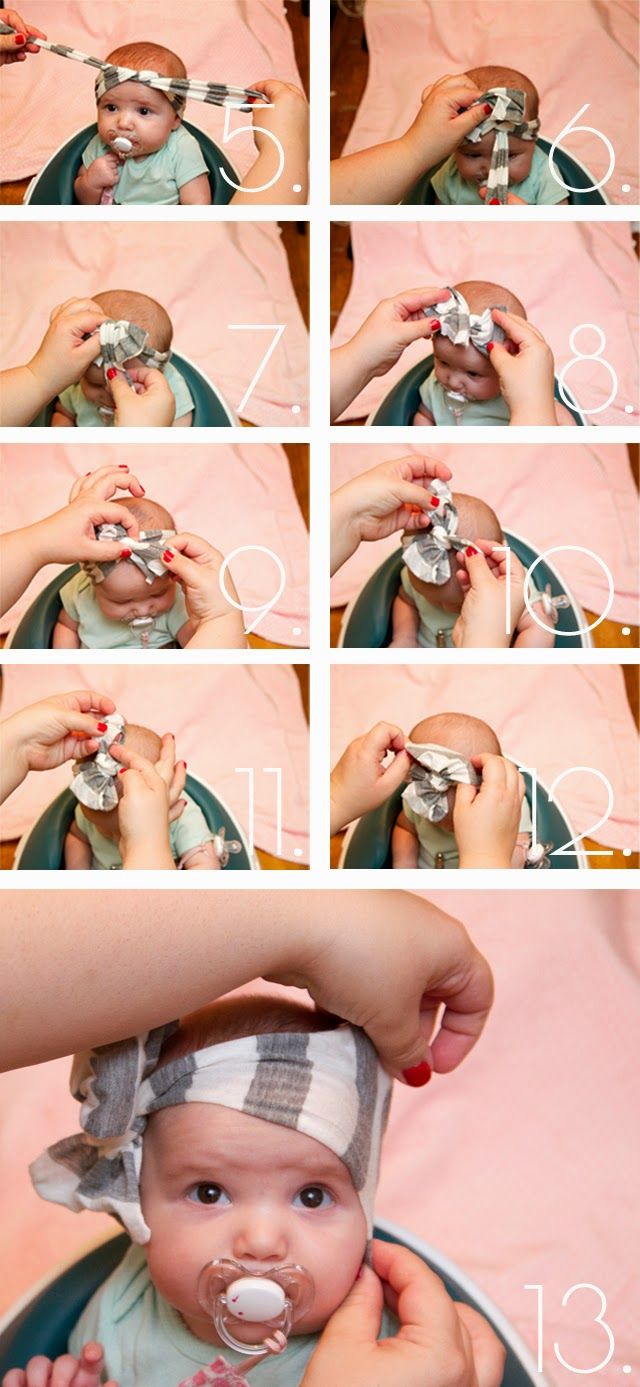
Tie a Bow
You need something about the same size as your baby’s head to tie the bow around, but again, it doesn’t have to be exact. In fact, I would try to err on the smaller side. (It will come in handy a little later.) I suggest using your leg or thigh- it worked perfectly for me.
Then you simply tie a bow. The main trick here is to try to keep the top of the fabric up as you tie. Don’t stress over getting it perfect as you go. You can always fiddle with it and perfect it before you pull it tight.
If you want a little bow education, this video shows exactly how to tie a baby headwrap.
Or if you feel like you need a little more control of the fabric. Or want to hide the ends. You can use the method in this video.
By focusing on one side of the bow at a time you have a little more control. And you can choose to tuck your second side through the middle of the knot instead of the top like I did for this smaller headband version below.
Once you’re happy with how your bow looks, pull it tight so it stays put. If you tied your bow a little on the smaller side then you can use the headband side to pull your bow tight without messing it up.