
Create A Free-Style Stitched Pendant Using Encrusted Embroidery
An easy-peasy project that could be done in a weekend or two, using leftover beading materials from previous projects and a unique button from Grandma’s button box.
Who doesn’t need new or extra jewelry? Though there are a lot of choices from a brick-and-mortar or online store, nothing would be better than the work of your own hands. If you are a stitcher and a beader, then this project will give you much pleasure while creating it. It is very important that you have basic embroidery knowledge to pursue this project. Be aware that it is an addictive hobby.
For a start, take out your grandma’s button box and pick a piece that signifies your character and personality the most. The button will be the focal point of the pendant. Remember that this is a piece of jewelry that will tell about yourself. Next, gather all your leftover beads from previous projects, as they will be the main ingredients in making this elegant freestyle stitched pendant.
Materials Needed For The Pendant Only
- a piece of a unique button – the bigger, the better, could be vintage, new or fancy
- assorted sizes and colors of seed, bugle, and decorative beads (Refer to Photo 4)
- beading needles – make sure to have extra on hand, at least four pieces
- nymo thread – in coordinating colors
- base fabric – could be cotton, silk, or better yet the fancy fabric
- fabric stiffener – skirtex preferred, but timtex and buckram would also work well
- tacky glue (optional)
- basic hand-sewing supplies: needles, scissors & measuring tape (or foot rule)
General Stitching Instructions and Assembly
- Determine the shape of your pendant; it doesn’t matter whether you choose an asymmetrical shape, as long as the button cabochon will fit inside the shape.
- Once the shape is established, draw it on the skirtex then cut two identical shapes (one for front base fabric and one for backing fabric).
- Using the trimmed skirtex as a guide, cut two pieces of fabric with at least an inch seam allowance all around.
- Center skirtex on the wrong side of the front fabric. Fold-in the seam allowance then secure with tacky glue or by basting with coordinating thread. Do the same with the backing fabric.
- Position the button on the front base fabric anywhere you like. If the button you chose has a shank, trim the shank then attach it to the fabric using tacky glue. If the button has holes, attach it to the fabric by sewing.
- Cage the button with seed beads. Note: It is highly recommended to cage the button generously to make sure it will not detach nor move.
- Using coordinating nymo threads, fill the remaining part of the front base fabric with various beads using your favorite beading stitches, i.e., moss, seed, or lazy stitch. Note: Make sure no fabric is visible before attaching the backing fabric.
- Join the front base fabric and backing fabric by slip stitching or whipstitching. (Refer to Photo 3)
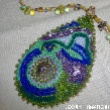
- Embellish the entire edge of the pendant generously with coordinating beads to hide the connection of front base fabric and backing fabric. (Refer to Photo 2)
- And lastly, attach a metal bail at the top part of the pendant – or better yet, use seed beads as bail.
String co-ordinating beads for the chain or simply use a store-bought metal chain that complements the design.