
There are no such things as ‘mistakes’ in ribbon embroidery. Trust me!
It looks difficult to do, but ribbon embroidery is incredibly easy (and each project unique — even from a pattern). Give it a shot, and see what you come up with!
Ribbon embroidery begins with four things: Fabric to stitch on, a needle with a wide eye, ribbon, and your own sense of adventure.
Whether you use a pattern or go with your own ideas, everyone creates something unique. You and a friend can start out on the same project and end up with two completely different-looking pieces, even if you use the same stitches and supplies.
Creating individual results every time is one of the great advantages of ribbon embroidery. Another is that you don’t make mistakes — you only make variations. Pulling too tightly or having lopsided stitches only improves your work and makes it more realistic. It also shows your individuality as an embroiderer.
Because ribbon is wider than floss, it works up quickly, spreading over a larger area in a short amount of time (consider how many cross-stitches it would take to cover that same area). Ribbon, especially silk ribbon, comes in many different widths and colors, including variegated, as well as blends.
A silk organza ribbon adds sparkle to your work, and an extra dimension of color as well. Experiment with the different widths and discover which ones look the most realistic for the stitches you use.
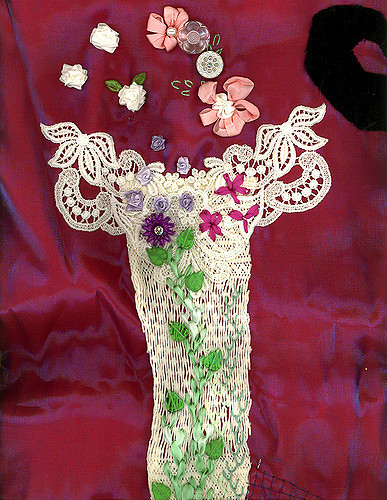
Silk ribbon embroidery is often used for stitching gorgeous birds, bugs, and blooms. But you can also tack down the sides of the ribbon to the fabric to represent a bride’s gown, a woven basket, or a cat’s tail.
Simple stitches for ribbon embroidery include Lazy Daisy, Japanese Ribbon Stitch (aka Ribbon Stitch), Spider-web Rose (using floss for the base), and Colonial Knot.
Ribbon embroidery is used on crazy quilts, showcasing beautiful stitches along the seams of each patch, to embellish clothing, for framed artwork, on sachets, and various other fabric items such as pillowcases and towels. You can incorporate beads, floss, yarn, or any other materials you wish.
Before using your ribbon, follow the directions on the package for washing it to avoid having any color rub off or stain your fabric later on.
Knotting the needle to begin your silk ribbon embroidery project is different than using floss. You may be tempted to tie a knot at the end, but this increases the already huge amount of bulk at the back and should be avoided. To create the knot, thread the needle with the ribbon. Fold over a small edge at the other end of the ribbon once, and pierce it with the needle. Pull the needle and the ribbon all the way through to form the knot.
You may wish to lock the needle on to the ribbon if you have trouble with the needle slipping off, but it’s not necessary. To do so, simply thread the needle with the ribbon, piercing the ribbon about 1/2″ away from the threaded end, and pull it through.
Now that you’re familiar with silk ribbon embroidery, I’ll introduce you to the basic stitches, more advanced ones, and share one of my patterns with you.